
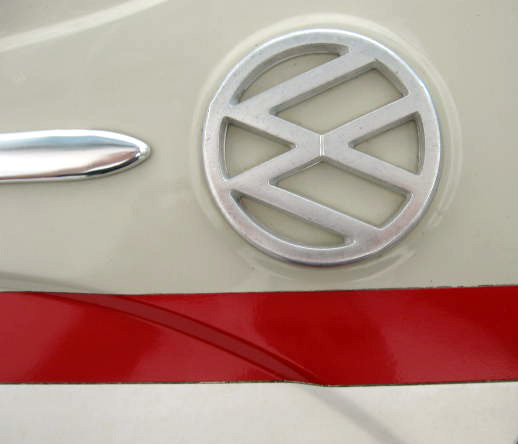
So, you want to build your very own Herbie? Hmm, the recipe seems easy enough. Just find a 1963 sunroof beetle, paint it The factory VW color, L87 Pearl white, and slap on some stickers! OK, well it's not quite that easy, but you will find that creating a Herbie can be a fun and rewarding experience. We'll talk more about the details later, but for now I want to cover decals and their placement. Step one, use the correct font for the numbers. See the above thumbnail. Click on that bad boy to see the graphic in full detail. Print it and keep it! Just so you know, the Herbie gurus have not been able to locate the official font that Disney used. One theory is that Disney created this font just for Herbie. If you find it somewhere PLEASE drop me a note. OK, now that you have the correct font it's time for some basic homework. You'll need to fire up your DVD players for this next part. Watch ALL of the films and pay attention to the decals on the cars. Look closely. You may want to do some freeze frame action. Or, if you'd rather not step away from your computer just go back to my main page and click on the movie still links. Once you've studied all of the Herbie films you will notice a pattern. The pattern is that the stripes and decals never seem to be the same on any two cars. Actually, there are always slight fluctuations in placement. When I put the decals on my car I used movie stills from Herbie rides again to come up with proper placement. I hope these detailed photos of the decals, dimensions, and their placement on my car will enable you to build a correct looking Herbie of your very own!
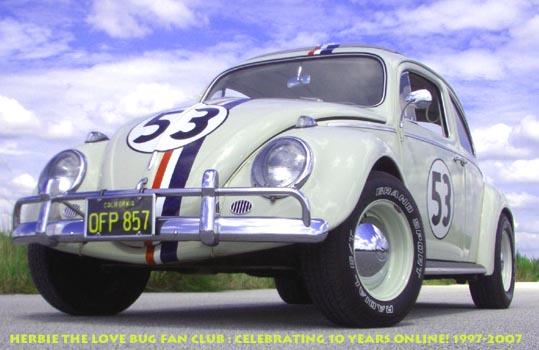
The number one question I am asked is where to get Herbie decals. I usually refer everyone to Greg for a complete kit for a bargain price. However, if you'd rather make them yourself here's what you need to know:
|
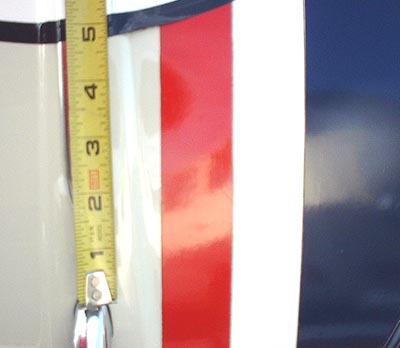
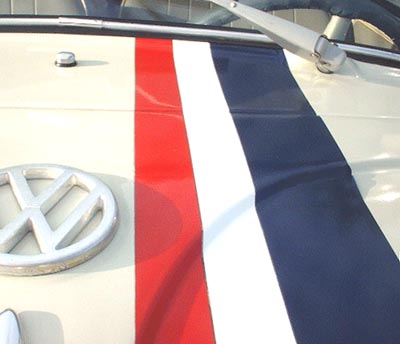
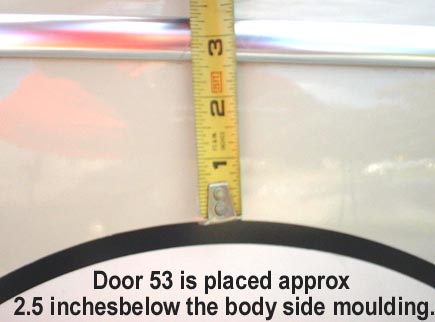
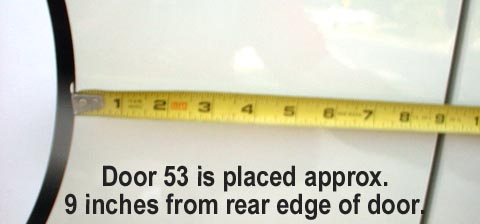
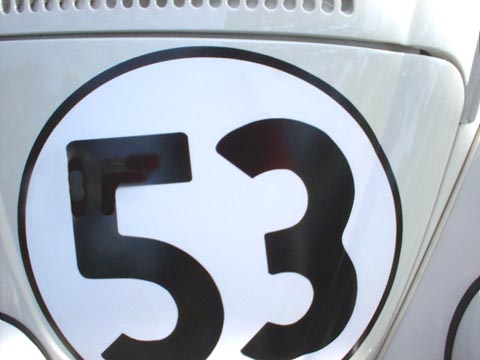
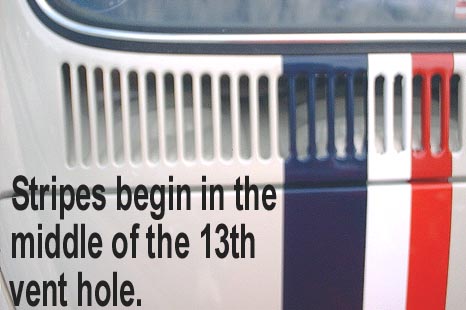
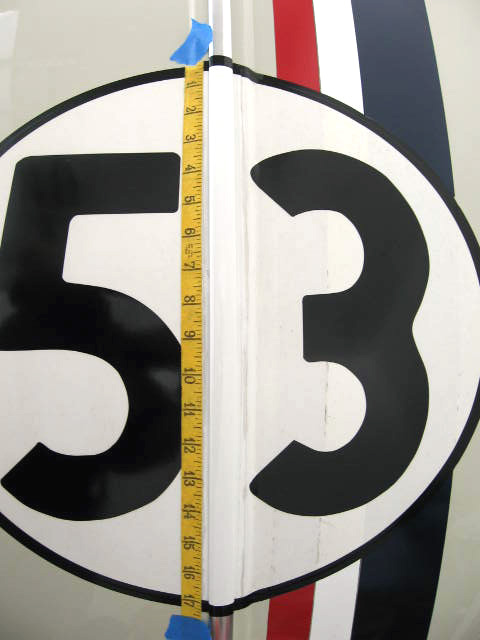
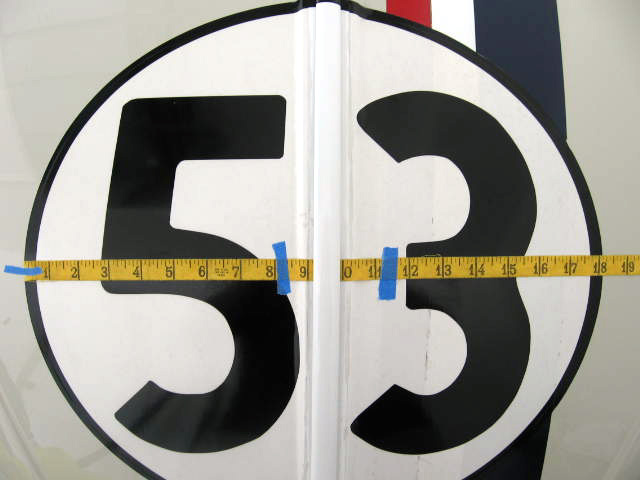
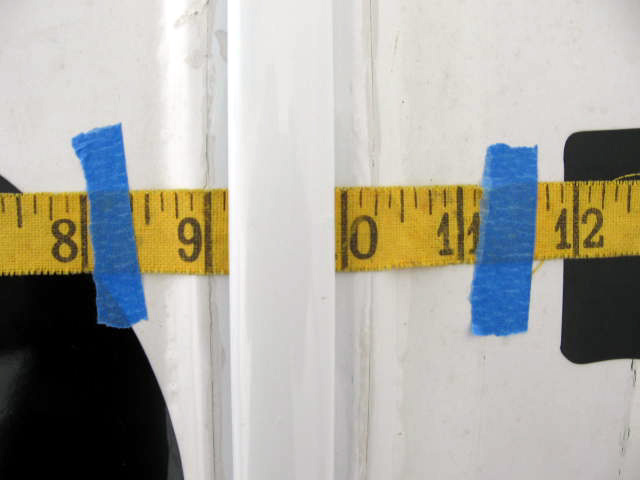
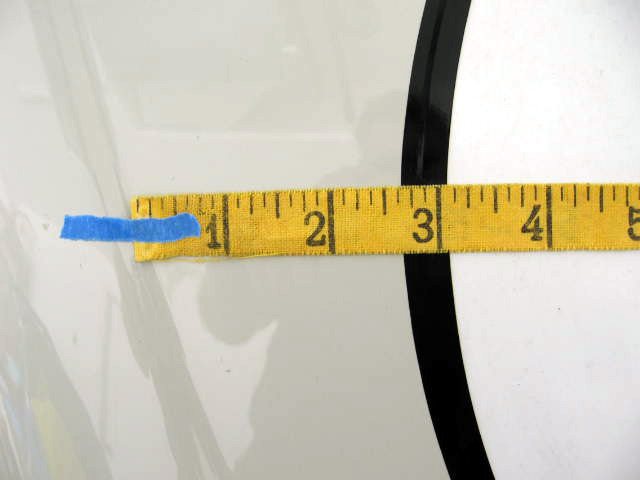
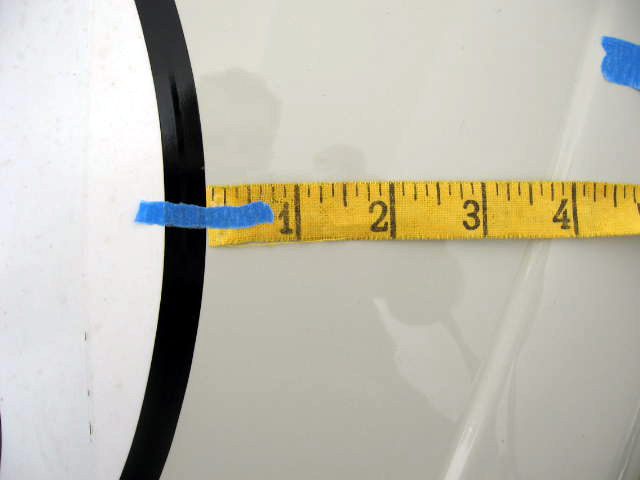
The door and rear deck lid 53s are 16 1/2 inches across. The outer black circle on them is 3/8 of an inch wide. The front hood 53 decal is the most complex. It is 17 3/4 inches across. The decal must be cut into sections to be applied. I don't have a picture of the front decal but the circle is actually elongated with extra spacing between the 5 and 3. This is to accommodate the ridge in the front hood. The numbers themselves are all 10 1/2 tall by 5 inches wide and are 2 inches thick. My car uses separate stripes for each color. Together, the stripes are 5 1/2 inches wide. The red and white stripes are each 1 3/8 inches thick. The blue is 2 3/4 thick. Just remember, the width of the white and red stripes together equals the width of the blue. If you're on a budget and looking for Herbie decals please e-mail Greg by clicking the HERE. Greg sells a set that is pretty dead on to the originals. A little history on Herbie graphics. A friend of mine, VW collector Daryl Adams owned several Herbie's in the early 90's. He had restored a few and in his restoration had printed extra Herbie 53 decals. When I purchased my Herbie in 94 I purchased four 53 decals and a front OFP 857 Herbie license plate from Daryl. When Daryl found out I was building a Herbie he told me about this young guy who was also building a Herbie. Daryl put me in touch with Bob Hoag. Bob eventually sent me some pictures of his car (in the mail ...before the web was a big thing) and when I opened the package my jaw hit the floor! Bob had created THE HERBIE! His car was the first ever, EXACT replica of Herbie. In fact, his car looked BETTER than some restored originals! Why? B ecause Bob is a true enthusiast. I like to call Bob Hoag the Grandfather (even though he's a young guy) of the correct Herbie graphics set. Without him, who knows were the hobby would have gone. Bob was such an enthusiast about detail that he went out to California and researched Disney's archives (when the were open to the public) to create dead on decals for his car. I got my original front 53 and stripes from Bob, but the door and deck lid 53s were from Daryl. Bob was the guy who also sold sets of decals to Greg Carr for his Herbie replica. Greg later had the kit duplicated and began selling them to the public. Greg's decals are a bit different in their construction. Unlike Bob's where the stripes are individual pieces of colored vinyl and the black and while 53s are made up of separate pieces, Greg's kit features printed vinyl. The numbers and stripes are printed directly onto white vinyl. This makes installation easier because the three stripes are actually one piece. Chances are, if you see a Herbie on the road today it probably has one of Greg's kits. There are plusses and minuses to both kids of decals. The separate stripes will not fade like printed vinyl but they will shrink and separate. I'm going to include pictures of my car's graphics CLOSE up so you can see what a decade plus of life has done to them. And keep in mind, my car has been garaged most of that time. I'm told normal life expectancy for vinyl graphics is 3-4 years. |
Just where do those decals go?
OK, so you've learned a bit about Herbie graphics history and you're ready to put them on. But before you rush out and start applying your decals on you might want to consider the complexity of the task. If you've never installed vinyl decals before let me caution you, they are a lot harder to apply than they look, especially the front 53. You may want to consider a vinyl sign shop for installation. Decision made yet? Ok, let's go. The door and deck lid 53s are fairly easy. You just have to deal with air bubbles. If you spray the door with water and apply the decal you can position it properly. Once positioned work from the center out and squeegee all the air bubbles out. take your time. The stripes will give you some trouble on curved surfaces (along with the usual air pockets). Make sure you work in warm temps when applying the vinyl and DO NOT stretch it tight! If you do, it will shrink and lift after installation. Keep it as loose as possible. The front 53 is the difficult one. I think I have a few new gray hairs because of that one. the problem is that you are dealing with a surface that is curved in TWO directions. When I installed my set back in 1997 I used water, a squeegee, and even a hair dryer. The end result was pretty good. Although, vinyl doesn't last very long when exposed to the elements. If you are going to keep your car outside you might even consider having the decals painted on. WARNING, this will be expensive! I never measured my car before installing the stripes. I just eye-balled the movie stills for placement. I did some calculating for the doors based on other stills, but remember that decal placement varied from car to car. I don't think it was an exact science. Plus, Disney probably never though fans would be nit-picking their work years later. Hope this page helps. Good luck! Drop me an e-mail if you need any advice.
Click on the thumbnail pictures below for an expanded view.

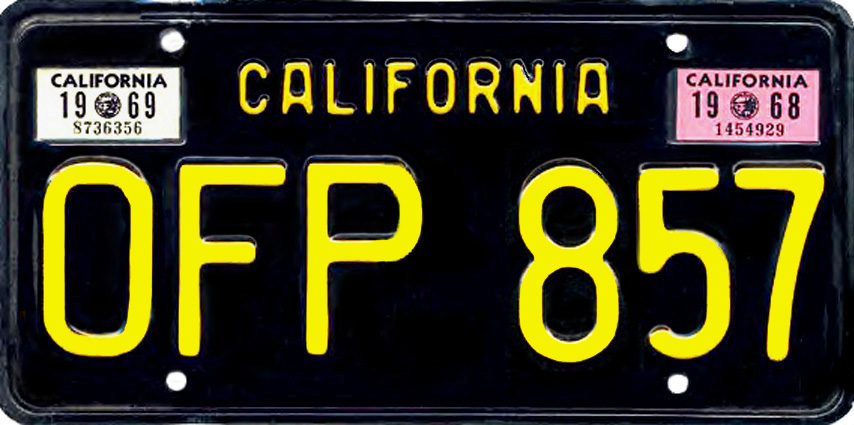
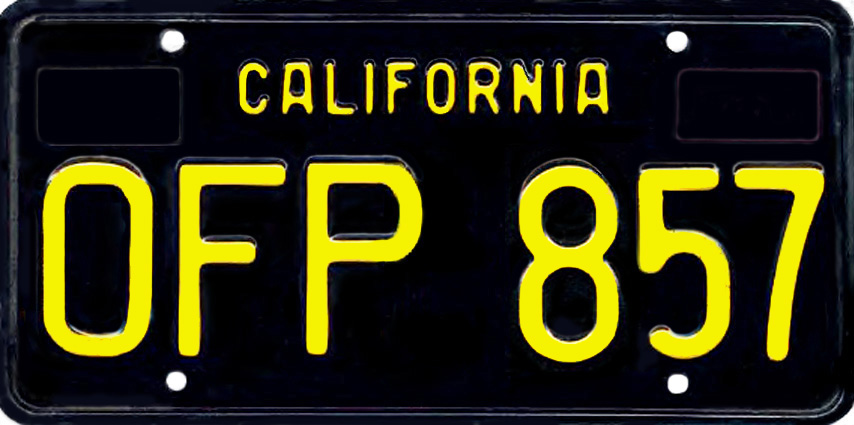 Front license plate.
As I stated earlier, the decals on my car are over ten years old. Herbie does get driven and is always exposed to rain, cold and extreme heat. Oh yeah, and let me not forget all the stone and bug impacts! Needless to say, the vinyl does take a beating. In normal photos its hard to see any flaws (see recent photo above) but up close you can see the damage.
Check these pictures out. Click on the thumbnails for a larger view.
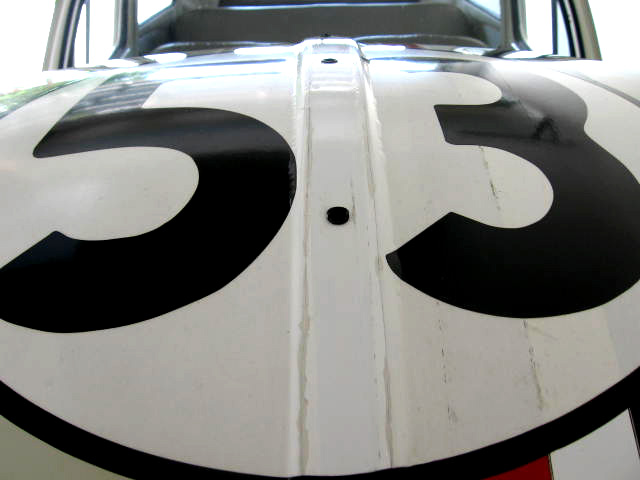
1. This is the hood 53 with the chrome removed. You can see the color difference and the cracking.
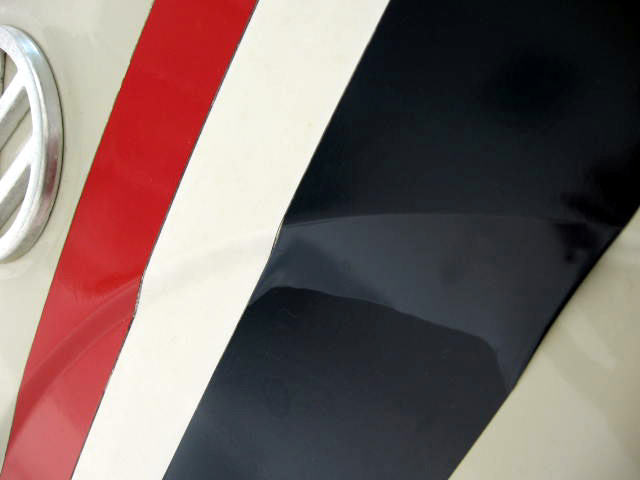
2. You can see how the stripes have shrunk a bit over the years. I did place the 53 on top of the stripe. Some people cut the stripes around the 53. In retrospect, I think the best way would be to have the stripes about even with the black outline (where it starts) so that there is no gap showing between the two but not having the stripes go all the way under.
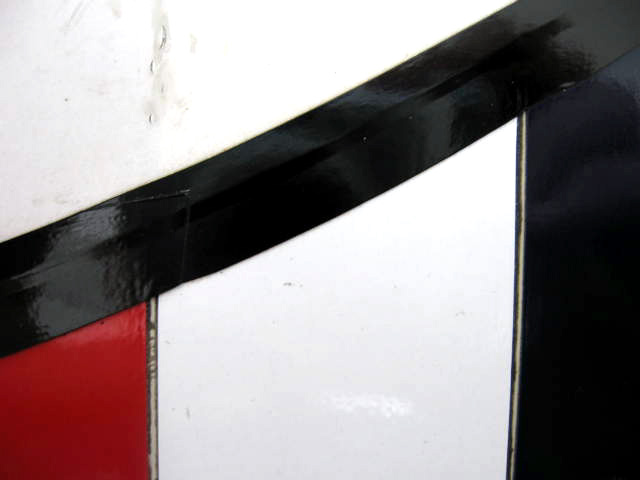
3.You can see in the picture below how the blue has lifted. The hood stripe (blue portion) has been the worst. I actually replaced this blue piece four or five years ago for this very same reason.
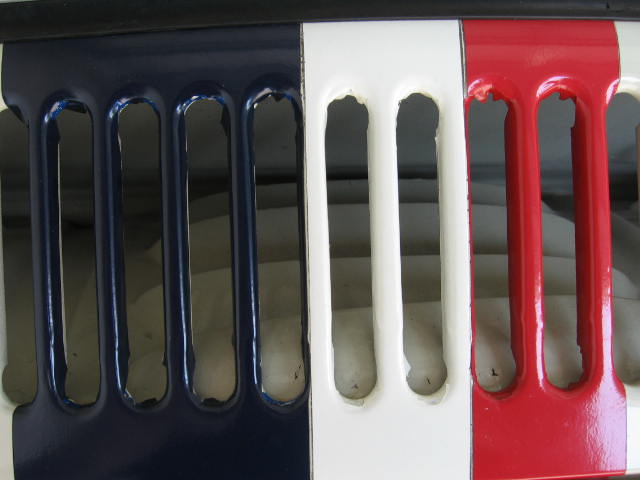
4.Rear engine vent grilles. Just cut and fold the pieces over. You can also trim and paint in there as well if you'd like.
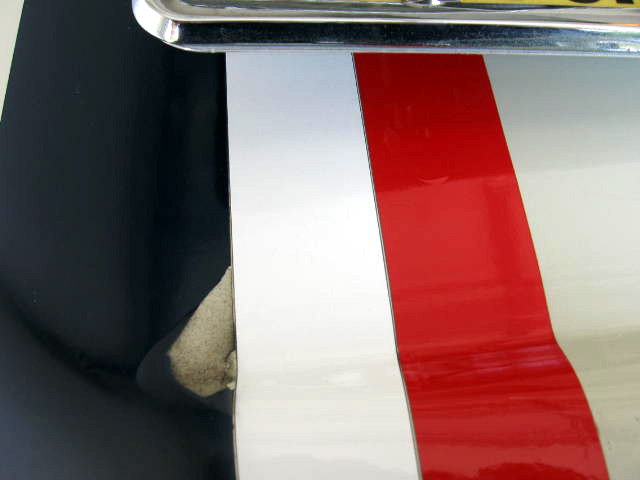
5. Here's the rear deck lid. the strip lifted and just recently tore due to being dried out. I'm debating on if I should change all of the stripes or just piece them in. Up close they look a little worn but as you can see in pictures they still look pretty fine!
Stay tuned for more detailed information on widened wheels, interior, and engine. More photos coming soon!
Wheels: Either 15X6 or 14X6 widened. Available from Stockton or Bolton wheels.
Interior: Gray vinyl seats, door panels and headliner. In addition, all interior surfaces (except chrome) are painted a matt gray. More details and hopefully a paint code soon.
Engine: Some Herbie's were powered by 1835 cc engines.
| Click HERE to return to the Herbie home page. |